
by Beth
According to core samples taken the day of the pour, it took only one week for the approximately 50 cubic yards of concrete in our basement walls to harden more than enough for the forms to come off. Over the next couple weeks, crew removed all the bracing and plywood it had taken 2 months to erect.

They broke off most of the exposed pieces of long-tail wall ties (those hundreds of little bars running horizontally through the walls that held the plywood firmly in place), leaving some wall ties and plywood in place to connect structure to, like scaffolding.

When wall ties are broken off, they leave 1″ divets in the concrete that have to be filled. Compound was added and rough edges sanded to create smooth walls, inside and out. There were a few “honeycombed” areas and a corner over the entry way that needed patching.

The inside of the walls will receive a much finer touch than the exterior. It may seem like smoothing the outside wall would be unnecessary, since it will be covered with other surfaces, starting with a waterproofing membrane and finishing, when we can afford it, with decorative rock. However, any holes and rough edges could puncture the waterproofing membrane, a material that looks like 3′-wide strips of electrical tape on steroids. Punctures lead to expensive leaks in the future, especially in the rainforest of the Smokies.
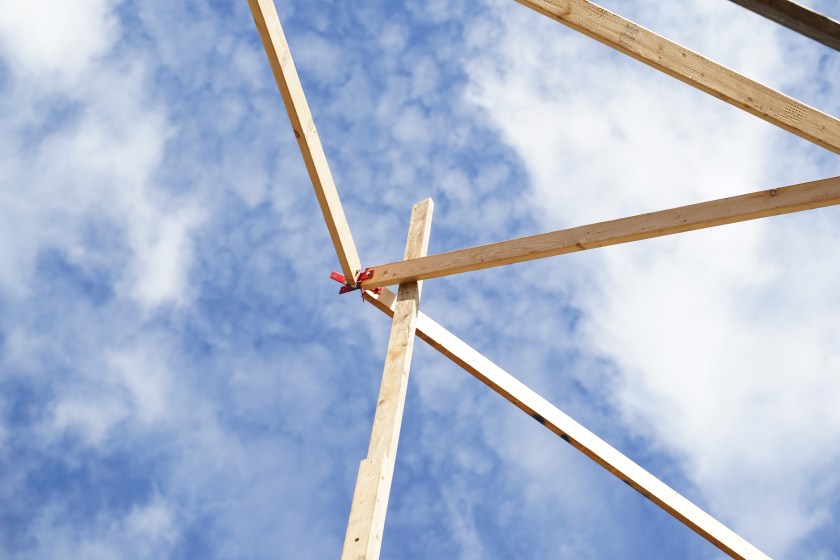
While crew smoothed the walls, Doug’s mind was working around the next major step to building the dome: the rib system.
Our geodesic dome came as a kit in the form of stacks of giant rectangles, trapezoids, and triangles made of styrofoam, concrete, and steel mesh.

The rib system is the wooden template to show where each triangle fits into the dome shape. When finished, the rib system looks like a skeleton of the dome, but unlike a skeleton, the ribs come out after all the panels are connected and the dome is self-supporting. To build the rib system, the dome kit came with 2 heavy boxes of color-coded steel hubs; a stack of pre-cut, color-coded 2×4 “ribs”; and an aggravatingly nebulous set of instructions.
Actually, to clarify: we paid extra for the prepared ribs to save on labor and confusion at the site. Money well spent. The price of wood’s sky high right now, so the prepared ribs we bought in 2017 ended up being a good deal. In addition, the hubs were supposed to be on loan, with a hefty deposit returned when we sent them back to the kit company. The kit company has since closed their doors, so we’ll have super awesome hubs for sale in 2021.
The nebulous instructions were free with the kit, in a giant binder of cryptic pages that clumsily convey 30 years of dome-assembly tips. Were the company still open, I’d be laying on the harsh reviews about the generic, badly written instructions that don’t account for entryways or custom features like the 2′ of extra vertical wall we added to the base of the shell. Support around those panels has to be figured out on-site, as do many other vital details. Man hours to have the crew decode various parts of the build will ultimately cost us thousands.
While Doug frowns some days more than others, he’s generally unphased. He says it’s standard for building-kit instructions to lack critical clarity. He’s seen it everywhere from log cabins to large-scale commercial builds. That’s why he’s here.
As the concrete forms came down, one of the biggest questions looming was whether we’d need to build the first floor to brace the ribs to. The ribs need all sorts of bracing to support the dome triangles.

We’d heard there had to be a first floor to run the rib bracing to, but if so, we had a problem. Building a first floor would mean a) pouring interior footers and slab, and if weather had allowed for that, b) framing the basement’s interior walls with wood so we could c) build the first floor with wood. Lots of wood.
Wood prices have been hovering at 150% above normal thanks to hurricane season and pandemic supply/demand. If a first floor were compulsory to brace the ribs, we would’ve had to call a time-out until prices came down. On the other hand, if there were a way to brace the ribs without a first floor, then we could move forward with putting the dome panels up and locking them safely into a dome shape. This would put us “in the dry,” meaning we’d have walls and roof and could start work on interior elements.
Doug began to show up daily to work alongside the crew. The tone at the site was intense. Chris and I had discussed trusting his judgment for the bracing and ribs so didn’t press him about his plans that week. There were times I’d pop up at the dome site only to wave hello and retreat to watch from afar.
We were growing progressively more hands-off on the build for a few reasons. We desperately want the bones of the dome done right. Structural mistakes are the scariest and most expensive to fix, and we knew no amount of YouTube could catch us up to Doug’s decades of wisdom and instinct. While we still needed to keep up with the details of the build and make decisions each step of the way, we didn’t have to locate, vet, hire, coordinate, and monitor crew and vendors. We didn’t have to comparison shop for supplies, pore over nebulous instructions, or make critical decisions about how to proceed. That was on Doug’s able shoulders.
Not only that, you’ll see a lot of “I” in this post because, with the world slowly re-opening, Chris had to hit the road more for work. In the past, I was so intimidated by construction that I almost didn’t want to talk about at the build without Chris right next to me. Now, I’m doing a lot of holding down the fort…er, watching the fort go up.
One unassuming morning after 3 years of waiting, the first dome panel went up, an event I happened to catch while walking the dogs. A huge moment for Chris and me but another basic learning moment for Doug, who was gauging the strength of the panel and how to best maneuver it, all while trying to squeeze details from the nebulous notebook about where, exactly, each panel should sit on top of the basement wall, or even how the panels were supposed to be turned.
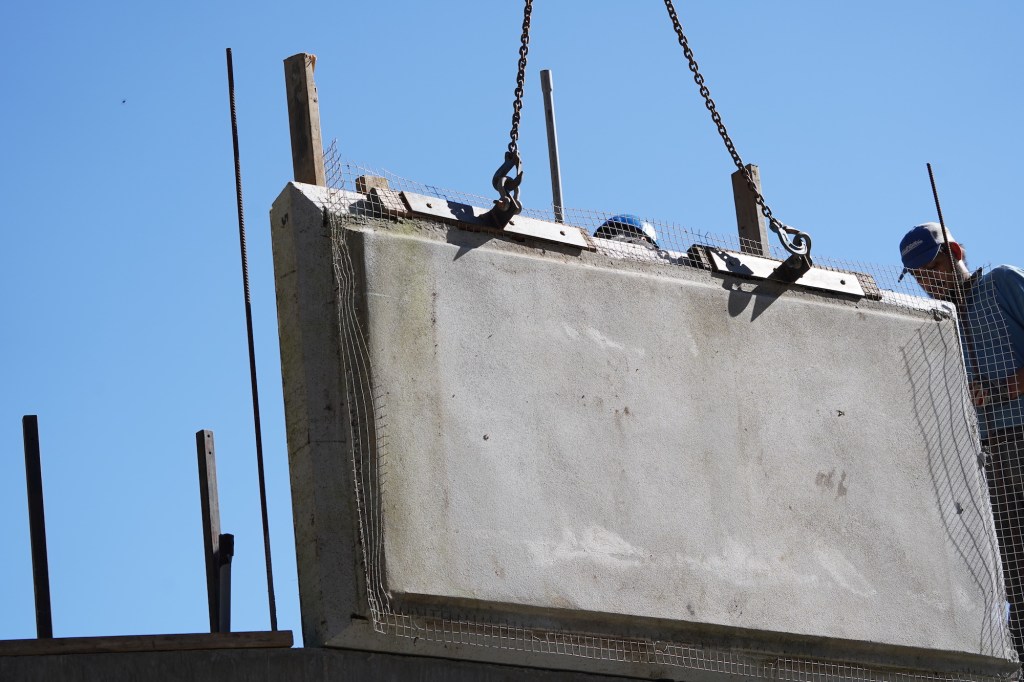
The shell starts with “risers,” rectangular panels that create 6′ of vertical space along the perimeter before the dome curves upward and inward. When the crew had the first panel in a spot that seemed close to correct, they built adjustable bracing around it. This would let it stand up to wind but still be wiggled into place as needed when other panels went up around it. They repeated that process for the whole first row of risers and entryway pieces, slowly building improvised ribs to brace all the vertical panels.

Next, they started building the triangular ribs that make the dome shape. This part was mostly covered in the notebook, which made progress easier for the crew. It was around this time that, down at barnbungalow, I’d hear laughter through the trees from the dome site. One afternoon, I even heard a, “Whooo!” like someone made a touchdown. Everything was working the way it should. Rib lengths were matching the hubs, and the hubs were fitting into a color-coded pattern. The crew made short work of the rest of the skeleton.

Forming the dome shape only took a week but was easily the most dramatic transformation of the build so far. Another reason for the lighter mood: after working with the first panels, Doug confirmed that we could brace the ribs without the first floor.


I can’t overstate how impactful it is to see this dome shape across the field after 3 years of planning and waiting.

With Doug breathing easier again, I began making longer visits to the site to talk about progress and where Chris and I could start adding our own labor into the build. Next, Doug will be checking measurements and making sure the ribs are exactly where they need to be. Then they’ll start putting up triangles and entryways, and Chris and I will tackle waterproofing basement walls amidst the epic fall color this year.


Awesome achievements so far.
I look forward to seeing the competed project!
LikeLiked by 1 person
Thank you so much. So do we!
LikeLike
Congrats on the progress! Is your dome going to have a cupola? A dome builder on Facebook is insistent that they must have one or they will leak. I just think they make the domes look extra cool, but have no technical experience. 😆 I’m jealous of your fall color. We had a hard freeze early on and all of our leaves just died and fell off. 🙁 2020 has basically robbed even the simple joys.
LikeLiked by 1 person
Thank you! We will have a cupola. They do look cool 🙂 A lot of domies believe in them for air circulation. Never heard of one preventing leaks, hmm. Maybe to prevent condensation? Sorry your fall color didn’t pop this year. At first it looked like that would happen here, but then we had this weeks-long, 3-phase fall color situation that was mind-blowingly beautiful.
LikeLike
I love keeping up with the progress of the dome and I’m so proud of what all y’all were doing!
LikeLiked by 1 person
Hi Beth,
Is this an American Ingenuity dome? I’ve been eyeing them for years, and just found out the company may be out of business?
Good luck with your build…. I’m super-jealous!
Laura!
LikeLiked by 1 person
Hi Laura, thank you for the comment. Yes, it’s AI. They did go out business. We hear regularly from people interested in these domes, so you’re not the only one eyeing them! Hopefully someone will open a similar dome-kit company again soon. We’ve seen a lot of areas where the build process they prescribed can be improved, but the kit materials have held up extremely well.
LikeLike
Wonderful post. My fiancé has participated in building a geodesic dome, but it was with the panels. We are interested how this turns out and how the finished project looks.
LikeLike
Thank you! These structures are really neat.
LikeLiked by 1 person