

by Beth
We’re building a home! It’s not the home we thought we’d be building, yet, but it’s a peach of a place: metal pole barn on the outside, cozy cottage on the inside. A barndominium.
Quick recap: We planned to build only one home on our acreage, a geodesic dome home. That’s why this blog is called EarthtoDome. Plan A was to live in a nearby rental home until the dome was move-in ready. Unfortunately, building an unconventional home can take lots and lots of time. This fall, after a year of struggle to bring the dome to life, we came to the realization that our building timeline could easily stretch another year or more. Then our rent was raised. Those lemons made the lemonade that is our Plan B, a.k.a, Plan Barnbungalow: we’re turning our barn into a home.
Our last post explains why we’re taking the dramatic step to build a whole new home instead of sticking it out at our current rental or renting elsewhere. This post is part 1 of a 2 part update about how far we’ve come.
We’ve come a long way. The field where the barn is used to look like this:

When we bought the land, we didn’t know what was under this. It was all kudzu and snakes and salamanders, beautiful in its own way, but it turned out to be hiding fantastic pasture. After removing kudzu we saw it was the perfect spot for a barn.

When we hired excavators to grade the driveway and help clear brush for the powerlines, we asked them to smooth an area for a barn pad, too.
I admit we had no idea how expensive or important excavating is to landownership, especially in the rocky rainforest of the Smokies. To build anything to last, you need ground that’s compacted and configured to drain well. Even if you do it yourself, renting and running the equipment is expensive. If you cut corners, repairs afterward can cost much more.
Since our budget was in shreds after Excavationstravaganza, we decided to save a few thousand by leaving the barn floor gravel, with dreams of a concrete slab at a later date.

After the gravel was down, this happened:
Fun fact: the man who welded those black rafters welds roller coasters at Dollywood.
Gravel is hard to walk on, but people said it would be great for drainage, and it was. Gravel has to be added before concrete is poured anyway, so it wouldn’t be money wasted when our concrete-floor dreams came true.

We put the barn to work sheltering Greta, Black Sunshine, building materials and yard implements.
Our Approach
Fast-forward to this fall. When we shared that we were going to move to our barn, some thought we were going to glamp in there, like with a camping stove and space heater. There’s no zoning to say we can’t, and it would’ve made for a faster move to the land, but Clover would never stand for it. If this dog finds 2 beds in the same room, she’ll stack them for a better rest.

Plenty of homesteaders set up in tents or campers while building more permanent accommodations. It’s a great way to save money and make memories, but that lifestyle can cause complications we don’t want to take on. We aren’t posh like our Princess and the Pea, but we do have full-time, remote jobs that require personal space for concentration and conference calls.
Our jobs make us function differently from many homesteaders in another way: we’re paying professionals instead of doing a lot of the work ourselves, a result of limited free time and a need to move out of our rental home ASAP.
This doesn’t mean we’re not involved. Project Barnbungalow is a 2nd full-time job for both of us. Chris is much more skilled and productive than he gives himself credit for. When he’s not traveling for work, he’s providing carpentry support. We research nonstop. We may only be able to pick up basic understanding of building concepts, but that knowledge helps us solicit quality bids and make informed decisions faster.
Because time isn’t just money. In this case, it’s sanity. After fighting for every step we took last year, we’ve really needed to see a home come to life on our land. It has restored our spirit and energy to stay off the beaten path.

One reason we chose a metal pole building is flexibility. You can start with a basic shell and add insulation, doors, floors, windows, walls, and utilities as budget allows.
That versatility meant it was easy to…
…add septic and plumbing.
Wait, “easy” isn’t the right word. Interesting and instructive, but not easy.
Before building on a concrete slab, you have to complete the first stage of plumbing, inaccurately called a “rough plumb,” because it’s pretty precise. What lays in concrete stays in concrete. The rough plumb is a careful placement of drains, vents, etc. that will be in the slab. Before moving forward at all, the house had to be planned down to the appliances and fixtures. Before we could do that, we had to know something even more fundamental: where water would come in and go out.
A phone call to our well man settled the fresh-water part. He got to work on a quote to run water down from the well. Wastewater was more complicated.
Our county is known for being one of few that opts out  of building permits, but permits are still required for septic and power. Shell out $500 online, and an inspector who covers several counties will come out Wednesday or Friday to do a perc test and draw a map of where to put your tank and drainfield.
Placement is restricted by factors that affect ground permeability and water purity: recent excavation, slopes, creeks, waterlines…all of which apply to the barn (if you don’t know how a septic tank works, you may or may not want to google that right now. Basically, the ground becomes a filtration system for your wastey stuff).
It’s common to have a perc test done before building anything. That’s what we did for the dome so we knew it could be built where we wanted. Since the barn already existed, we were lucky to find the right spot to wiggle in a septic system.
The inspector sent his map directly to a local excavator who didn’t come recommended but had given us a fair price in writing.

This is the tank after we opened it up for minor repairs thanks to shabby backfilling and corner cutting. He hasn’t returned our calls about it. Not to mention he had a Jekyll/Hyde thing going on and bullied us, aggressively and unsuccessfully, for payment before the job was done. That’s probably why he wasn’t recommended.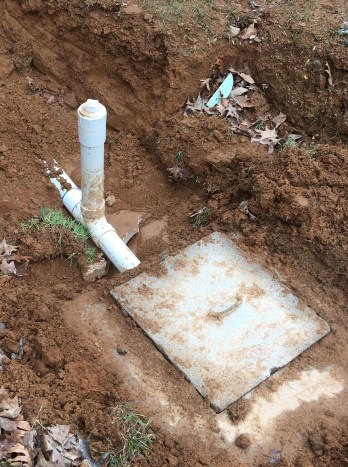
Hopefully the guts of the system will hold up. The inspector checked everything before it was covered. Just in case, we grabbed a shovel to unearth another connection we were worried about. It was fine, but it was a good thing to check before the system was put to use.
That excavator was one of a few choices we were about to make based on a bad motive when it comes to building: time. Traumatized by a year of not being able to line up work for the dome, we wanted no delays. During the first parts of this project, if someone said they could fit us in within the week, we were less discriminating about their buzz.
At least he came through on his promise to finish the work fast. It let us check a big item off the list in time for Chris to throw grass seed so we weren’t contending with terrible mud and erosion until spring. That’s fortunate because it’s been a record-breaking winter for rain.
With the tank in place, we took bids from plumbers and went with a reasonable quote from a group that came highly recommended. Again, we we were on their schedule sooner than expected. Everything was moving so fast that we were making changes to the house plans until the morning the plumbers arrived. I stayed up late the night before to research and select appliances and fixtures. We raced to the hardware store that morning to decide on shower dimensions.

This experience was better than septic but not perfect. Despite reviewing the plans together for an hour onsite before they started work, they put one pipe 3′ south of where it was supposed to be and another 2′ to the left. Being building noobs, we  didn’t detect the errors until we started framing, long after the slab was in. Luckily, it was as fixable as the septic.
The plumbers were professional, collaborative, and reviewed the work with me in detail before leaving for the day, but I neglected to pull my own measuring tape to compare the work directly to the plans. Honestly, I wouldn’t have caught the issues if I had. At the rough-in stage, nothing looks like it’s going to look, and my understanding of plumbing is below basic. It was our bad to have moved so fast that we scheduled contractors before the plans were ready.
…pour concrete floors.
The floor came next. And boy, is it pretty. Exactly what we wanted. That’s lucky, because the experience was one more mixed bag.
On the positive side, this group was ready to start the day after the  rough plumb (in between, our busy pest control guy found time to apply termite kill. Synergy!) They provided a fair quote in writing and easily understood our vision. The foreman texted pictures when we weren’t onsite, which we love. They get patience points for helping me put our signature in the corner of the patio, smoothing over about 8 rough drafts. Their cut marks (to help control concrete’s cracking as much as possible) are straight and symmetrical. After 3 months of heavy traffic and roller coaster weather, no cracks to report yet.
But we had to babysit them to add wire mat, rebar, reinforcements on the outside to keep the barn metal from bowing out, and a buffer between the concrete and metal so it wouldn’t corrode over time.

At the end, they raised the price without warning. We had them provide documentation. The new price didn’t really add up, but it wasn’t that outrageous, so we paid it for big-picture reasons that have to do with living peacefully out here. This was a local vendor whose family touches too many parts of our county.
It wasn’t fair and didn’t feel good, but you can’t argue with this floor. They polished it to a high shine, leaving enough tack so we’re not falling down all the time, and they put seal down.

If you seal concrete, you can’t add decorative paint or effects later. We went the seal route because we love showcasing the color of our local rock, and, yes: time. Sealing is a fast way to protect the concrete from footprints. It let us keep moving.
…choose and cut windows.
We drove to the warehouse of a local window supplier on an evening when the days were so short, dark, and rainy that east Tennesseans could leave their Christmas lights on 24/7. An hour with one of the proprietors was like a “windows 101” course. We played with the shop cat while weighing the differences of single-hung, double-hung, sliders, casements, transoms, vinyl frames, “clear” screens, and more. After a week of deep thought and emails, we ordered 3 slider windows that meet egress code, because we don’t have to follow code, but we prefer to; a single-hung for over the kitchen sink; and 2 exterior doors. I’ve since added a small, fixed window over the shower for natural light.

Before ordering, we did compare prices at a big box store. We might’ve saved $100-$200 there. That’s an estimate because it’s unclear if they sell apples-to-apples windows. It’s unclear because the big box didn’t offer the same service and counsel as the local supplier, who has been in business 60 years. It was an easy decision to go local.
With the window order in, we had rough-opening dimensions so window holes could be cut and framed in preparation for insulation. Everything at the beginning of a build is “rough” for some reason.

…insulate.
The 2 options we weighed for insulation were the “pink stuff” and sprayfoam (popular with tiny homes but more costly). We chose sprayfoam for the following reasons:
- Longer lifespan by decades.
- Ultra energy efficient – Utility bills in our crumbling rental house are $300-$500/month no matter what we do. We’re so ready to stop the waste.
- Keeps the walls slim – We would’ve had to frame all 4 interior walls and the ceiling to install the pink stuff, resulting in loss of usable space. Instead, we’re installing tongue & groove directly over the sprayfoam on 3 of the 4 interior-perimeter walls, giving it a cabin feel (the 4th wall, at the back of the barn, is framed out 8″ to contain the electrical and plumbing components).
- It’s supposed to strengthen the structure – The foam dries hard as rock.
For savings, we thought about using pink stuff in the walls and spraying only the ceiling, where most heat loss occurs, but apparently that can cause wicked condensation. Indoor rain.
Other things we learned about sprayfoam: It’s a bear to safely install because it contains fiberglass. It makes the jobs of your electrician and framer harder because they can’t push it aside like the pink stuff, and cutting into it makes itchy dust; it has fiberglass like the pink stuff. If possible, consult with them before you add sprayfoam.
We weren’t up to the challenge of learning to safely install this deal-with-the-devil magic substance, so we bid this to professionals. The lowest quote was from the person who seemed the most knowledgeable and professional. We love it when that happens. They finished in a day and left a clean site. We’ve already recommended them to others.
…frame the interior. 
Speaking of framing, with insulation in, it was time for the interior to take shape. We’ve been blessed with a talented carpenter and teammate who has helped us shape the interior of the home. His knowledge and workstyle brought the vibe this place needed. As soon as he started work, the project shifted from nervous and urgent to all good.
He pinned Houseplan Version Who-Even-Knows-Anymore to a post, and a week after the sprayfoam was in, the interior looked like this:
 We regularly huddle to update the plans as the project evolves. He gets our approach and is good at helping us understand the most economical way to do things, the consequences, what he would do if it were his house, etc. When Chris isn’t working, he handles supply runs and carpentry support. The way we all work together is the way we hope the dome will go, too.
After framing comes walls, but first we have to install what goes behind the walls, like power and water.
That meant excavation, which can’t be done when it rains all the time. Just as we were starting to worry that the weather would slow construction down, the sun came out. Find out what happened next in part 2 of the barnbungalow update.
